LiteSpeed Cache is a high-performance, server-level caching solution for web servers. It is primarily designed for the LiteSpeed Web Server but is also compatible with other web servers like Apache and Nginx through various plugins.
It is known for its speed and efficiency in accelerating the performance of websites and web applications.
LiteSpeed Cache can perform the following:
- Page Caching: It stores a copy of the entirely generated HTML page in memory or on disk, allowing subsequent requests to be served much faster.
- Object Caching: LiteSpeed Cache can cache various objects such as database queries, objects, and fragments to reduce server load and improve response times.
- Content Compression: It can automatically compress web content, reducing the size of files sent to the client, which results in faster loading times.
- Image Optimization: This feature can help optimize and serve images in a WebP format, which is more efficient than traditional image formats like JPEG or PNG.
- Browser Cache Support: LiteSpeed Cache manages and optimizes browser caching, reducing the need for the browser to re-download assets on subsequent visits.
- CDN Integration: It can work seamlessly with Content Delivery Networks (CDNs) such as CloudFlare and QUIC. Cloud’s CDN to further accelerate content delivery and reduce server load.
- Critical CSS: Automatically extracts and serves the essential CSS required for rendering the page above the fold, reducing render-blocking resources.
- Minification: It can minify CSS, JavaScript, and HTML to reduce file sizes and speed up page load times.
- Advanced Cache Purging: Provides tools for purging or refreshing cache selectively to ensure users see the most up-to-date content when necessary.
- WordPress Integration: There is a dedicated LiteSpeed Cache plugin for WordPress, which is one of the most popular Content Management Systems (CMS). This plugin offers easy integration and management of caching settings for WordPress websites.
- HTTP/2 and QUIC Support: It supports the latest HTTP/2 and QUIC protocols for faster content delivery.
- ESI (Edge Side Includes): LiteSpeed Cache can handle Edge Side Includes for dynamic elements, allowing for efficient caching of dynamic content.
LiteSpeed Cache Plugin is highly regarded for its performance, and it’s commonly used by website administrators and developers looking to optimize the speed and responsiveness of their web applications.
It is trendy in shared hosting environments and for websites that experience high traffic loads, as it can significantly reduce server resource usage and improve website loading times. More than 4M WordPress websites are optimized by the LiteSpeed cache plugin worldwide.
There’s no reason to use any other caching plugin since the LiteSpeed Cache plugin has excellent reviews, extensive settings, and faster server-level caching. It’s the best free cache plugin.
Also Read: Most Popular Brands That Are Using WordPress
LiteSpeed Cache Plugin Setup
The LiteSpeed Cache plugin comes pre-installed with all Hostinger accounts.
If you use a different web host, follow the instructions below to install LiteSpeed Cache for WordPress.
- Log in to your WordPress admin dashboard and go to the Plugins section.
- Search for LiteSpeed Cache, click Install Now, and Activate.
- Refresh the page – the LiteSpeed cache section will be on your Dashboard.
Once the WordPress plugin is installed and activated, you must configure it. Read the following section to find your WordPress site’s best LiteSpeed cache plugin settings.
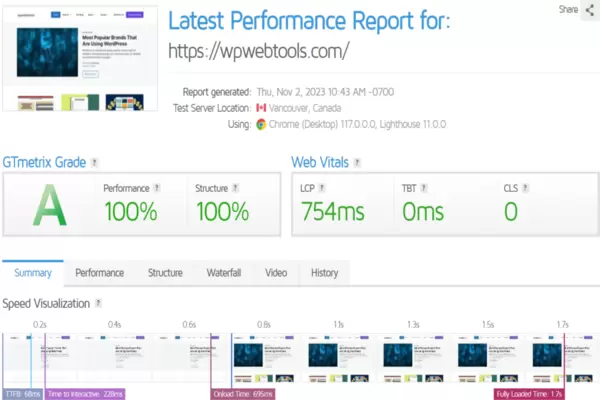
I want to declare an interest; I use these settings on WPWebTools to score high on the GTMetrix test site.
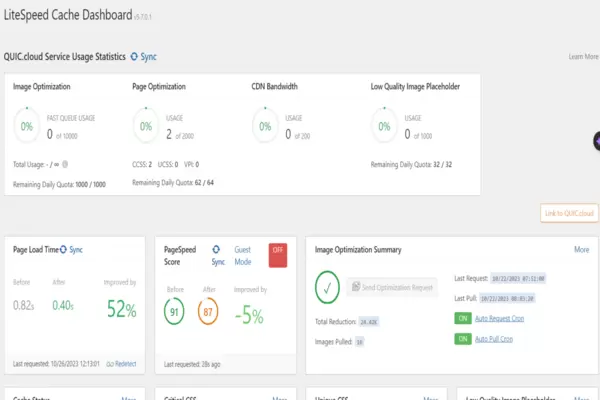
1. Dashboard
LiteSpeed’s Dashboard shows the status of optimized images, CDN usage, CSS, Image Optimization Summary, Cache Status, etc.
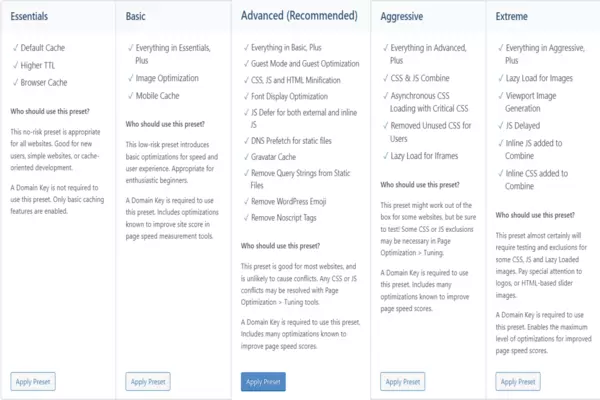
2. LiteSpeed Cache Configuration Presets
(1) Standard Presets
Here is an official LiteSpeed-designed Preset to configure your site in one click. I prefer Advanced Preset.
(2) Import/ Export
Used to import settings from a file, and you can export all settings and save them as a file. You reset all settings to the default settings.
3. LiteSpeed Cache General Settings
(1) General Settings
- Automatically Upgrade: ON
- Domain Key: Apply for a domain key if you prefer to use QUIC.cloud online services.
- Guest Mode: ON
- Guest Optimization: ON
- Server IP: Enter your IP Address to allow cloud services directly.
- Notifications: ON
Click Save to save the settings.
(2) Tuning Settings
I prefer to lease the default settings.
4. LiteSpeed Cache Settings
(1) Cache
- Enable Cache: ON
- Cache Logged-in Users: OFF
- Cache Commenters: ON
- Cache REST API: ON
- Cache Login Page: ON
- Cache favicon.ico: ON
- Cache PHP Resources: ON
- Cache Mobile: OFF
- List of Mobile User Agents: Leave as it is
- Private Cached URIs: Leave as it is
- Force Cache URIs: Leave as it is
- Force Public Cache URIs: Leave as it is
- Drop Query String: Leave the default values
Save Changes
(2) TTL
- Default Public Cache TTL: Leave the default value
- Default Private Cache TTL: Leave the default value
- Default Front Page TTL: Leave the default value
- Default Feed TTL: Leave the default value
- Default REST TTL: Leave the default value
- Default HTTP Status Code Page TTL: Leave the default value
Save Changes
(3) Purge
- Purge All On Upgrade: ON
- Auto Purge Rules For Publish/Update: Leave the default value
- Serve Stale: OFF
- Scheduled Purge URLs: Leave as it is
- Scheduled Purge Time: Leave as it is
- Purge All Hooks: Leave the default value
Save Changes
(4) Excludes
- Do Not Cache URIs: Leave as it is
- Do Not Cache Query Strings: Leave as it is
- Do Not Cache Categories: Leave as it is
- Do Not Cache Tags: Leave as it is
- Do Not Cache Cookies: Leave as it is
- Do Not Cache User Agents: Leave as it is
- Do Not Cache Roles: Leave as it is
Save Changes
(5) ESI
- Enable ESI: OFF
- Cache Admin Bar: ON
- Cache Comment Form: ON
- ESI Nonces: Leave the default value
- Vary Group: Leave the default value
Save Changes
(6) Object
- Object Cache: ON
- Method: I prefer Redis
- Host: Leave the default value
- Default Object Lifetime: Leave the default value
- Username: Leave the default value
- Password: Leave the default value
- Redis Database ID: Leave the default value
- Global Groups: Leave the default value
- Do Not Cache Groups: Leave the default value
- Persistent Connection: ON
- Cache WP-Admin: OFF
- Store Transients: ON
Save Changes
(7) Browser
- Browser Cache: ON
- Browser Cache TTL: Leave the default value
Save Changes
(8) Advanced
- Login Cookie: Leave as it is
- Improve HTTP/HTTPS Compatibility: OFF
- Instant Click: ON
Save Changes
5. LiteSpeed Cache CDN
(1) CDN Settings
- QUIC.cloud CDN: ON (Here, I prefer to use both Cloudflare and Quic. cloud CDN)
- Use CDN Mapping: OFF
- HTML Attribute To Replace: Leave it as it is
- Original URLs: Leave as it is
- Included Directories: Leave as it is
- Exclude Path: Leave as it is
- Cloudflare API: Enter the Cloudflare credentials to use the Cloudflare API functionality.
Save Changes
(2) QUIC.cloud CDN Setup
Link your website with Quic. Cloud. You can use both Cloudflare and Quic here. Cloud CDN.
(3) Manage
- Leave it as it is if you do not prefer not to use Quic. cloud
6. LiteSpeed Cache Image Optimization
(1) Image Optimization Summary
Here, you can optimize the image by sending the optimization request
(2) Image Optimization Settings
- Auto Request Cron: ON
- Auto Pull Cron: ON
- Optimize Original Images: ON
- Remove Original Backups: OFF
- Optimize Losslessly: OFF
- Preserve EXIF/XMP data: OFF
- Image WebP Replacement: ON
- WebP Attribute To Replace: Leave it as it is
- WebP For Extra srcset: ON
- WordPress Image Quality Control: 85
Save Changes
Also Read: A WordPress Plugin: The Complete Guides 2023
7. LiteSpeed Cache Page Optimization
(1) CSS Settings
- CSS Minify: ON
- CSS Combine: OFF
- Generate UCSS: OFF
- UCSS Inline: OFF
- CSS Combine External and Inline: OFF
- Load CSS Asynchronously: OFF
- CCSS Per URL: ON
- Inline CSS Async Lib: OFF
- Font Display Optimization: Swap
Save Changes
(2) JS Settings
- JS Minify: ON
- JS Combine: OFF
- JS Combine External and Inline: OFF
- Load JS Deferred: OFF
Save Changes
(3) HTML Settings
- HTML Minify: ON
- DNS Prefetch: I prefer to Leave it as it is
- DNS Prefetch Control: ON
- DNS Preconnect: I prefer to Leave it as it is
- HTML Lazy Load Selectors: I prefer to Leave it as it is
- Remove Query Strings: ON
- Load Google Fonts Asynchronously: OFF
- Remove Google Fonts: OFF
- Remove WordPress Emoji: ON
- Remove Noscript Tags: ON
Save Changes
(4) Media Settings
- Lazy Load Images: ON
- Basic Image Placeholder: I prefer to Leave it as it is
- Responsive Placeholder: ON
- Responsive Placeholder SVG: I prefer to Leave it as it is
- Responsive Placeholder Color: I prefer to Leave it as it is
- LQIP Cloud Generator: ON
- LQIP Quality: I prefer to Leave it as it is
- LQIP Minimum Dimensions: I prefer to Leave it as it is
- Generate LQIP In Background: ON
- Lazy Load Iframes: ON
- Add Missing Sizes: ON
Save Changes
(5) VPI
- Viewport Images: ON
- Viewport Images Cron: ON
SaveChanges
(6) Media Excludes
- Lazy Load Image Excludes: I prefer to Leave it as it is
- Lazy Load Image Class Name Excludes: I prefer to Leave it as it is
- Lazy Load Image Parent Class Name Excludes: I prefer to Leave it as it is
- Lazy Load Iframe Class Name Excludes: I prefer to Leave it as it is
- Lazy Load Iframe Parent Class Name Excludes: I prefer to Leave it as it is
- Lazy Load URI Excludes: I prefer to Leave it as it is
- LQIP Excludes: I prefer to Leave it as it is
Save Changes
(7) Localization
- Gravatar Cache: ON
- Gravatar Cache Cron: ON
- Gravatar Cache TTL: Leave the default value
- Localize Resources: ON
- Localization Files: I prefer to Leave it as it is
Save Changes
(8) Tuning
- JS Delayed Includes: I prefer to Leave it as it is
- JS Excludes: I prefer to Leave it as it is
- JS Deferred / Delayed Excludes: I prefer to Leave it as it is
- Guest Mode JS Excludes: I prefer to Leave it as it is
- URI Excludes: I prefer to Leave it as it is
- Optimize for Guests Only: ON
- Role Excludes: I prefer to Leave it as it is
Save Changes
(9) Tuning – CSS
- CSS Excludes: I prefer to Leave it as it is
- UCSS File Excludes and Inline: I prefer to Leave it as it is
- UCSS Selector Allowlist: I prefer to Leave it as it is
- UCSS URI Excludes: I prefer to Leave it as it is
- Separate CCSS Cache Post Types: I prefer to Leave it as it is
- Separate CCSS Cache URIs: I prefer to Leave it as it is
- Critical CSS Rules: I prefer to Leave it as it is
Save Changes
8. LiteSpeed Cache Database Optimization
(1) Manage
- Database Optimizer: Click clear all to optimize the database
- Database Summary: I prefer to Leave it as it is
(2) DB Optimization Settings
- Revisions Max Number: 0
- Revisions Max Age: 0
Save Changes
9. LiteSpeed Cache Crawler
(1) Summary
- Crawler Cron: No action to perform
- Watch Crawler Status: No action to perform
(2) Map
- Sitemap List: I prefer to Leave it as it is
(3) Blocklist
Leave it as it is
(4) General Settings
- Crawler: ON
- Delay: I prefer to Leave it as it is
- Run Duration: I prefer to Leave it as it is
- Interval Between Runs: I prefer to Leave it as it is
- Crawl Interval: I prefer to Leave it as it is
- Threads: I prefer to Leave it as it is
- Timeout: I prefer to Leave it as it is
- Server Load Limit: I prefer to Leave it as it is
Save Changes
(5) Simulation Settings
- Role Simulation: I prefer to Leave it as it is
- Cookie Simulation: I prefer to Leave it as it is
(6) Sitemap Settings
- Custom Sitemap: Enter the full URL to your sitemap here
- Drop Domain from Sitemap: ON
- Sitemap Timeout: Leave the default value
Save Changes
KEEP READING
- How to Start a Blog: The Ultimate Checklist [2023]
- How to Start Affiliate Marketing: Beginner’s Guide 2023
- How To Register a Domain Name
- How to Make a WordPress Website In 2023
10. Toolbox
(1) Purge
Click any tab to purge
(2) Import/ Export
- Export Settings: This will export all current LiteSpeed Cache settings and save them as files.
- Import Settings: This will import settings from a file and override all current LiteSpeed Cache settings.
- Reset All Settings: This will reset all settings to default settings.
(3) View .htaccess:
- Frontend .htaccess Path: For beginners like me, leave it as it is
- Backend .htaccess Path: I prefer to Leave it as it is
- Current .htaccess Contents: I prefer to Leave it as it is
(4) Heartbeat
- Frontend Heartbeat Control: ON
- Frontend Heartbeat TTL: 120 sec
- Backend Heartbeat Control: ON
- Backend Heartbeat TTL: 60 sec
- Editor Heartbeat: ON
- Editor Heartbeat TTL: 15 sec
Save Changes
(5) Report
- System Information: useful for sending to official LS support
- Passwordless Link: To grant wp-admin access to the LiteSpeed Support Team, please generate a passwordless link for the currently logged-in user to be sent with the report.
- Notes: provide more information here to assist the LiteSpeed team with debugging.
Send to LiteSpeed
Also Read: All You Need to Know about WordPress Theme 2023
(6) Debug Settings
You shouldn’t change anything here unless you’re debugging issues with your site. I’ve never had to use it, as most issues related to caching have been easy to fix.
- Disable All Features: Turn ON only if you’re having debugging issues.
- Debug Log: turn ON only when debugging. Use the Admin IP option if you have so much traffic that your debug logs get too big.
- Admin IPs: enter your external IP to debug actions from your browser.
- Debug Level: choose Basic or Advanced depending on your needs.
- Log File Size Limit: increase only if you need it.
- Log Cookies: turn ON if needed.
- Collapse Query Strings: turn ON if needed.
- Debug URI Includes logs on the pages listed; useful if you’re only having issues on a specific page.
- Debug URI Excludes: exclude pages from your debug log.
- Debug String Excludes: I am not sure about this one
Save Changes
(7) Log View
- [A] Debug Log: Debug the log
- [B] Purge Log: Purge the log
- [C] Crawler Log: Crawler the log
- [D] Clear Log: Clear the log
- Clear Log: Clear the logs
(8) Beta Test
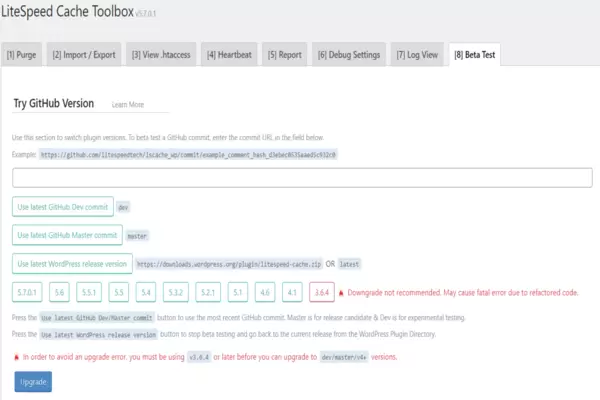
This area allows you to try versions of LSCWP not yet released officially to the public. Enter the GitHub commit URL into the text field and press Upgrade. If you don’t know the commit URL, use one of the buttons below instead.
- Use the latest GitHub commit: click this to try the latest GitHub version.
- Use the latest WordPress release version: click this to use the latest STABLE version of LSC.
The buttons with version numbers may be used to revert to a previous LSCWP version.
Also Read: What is WordPress? A Complete guides 2023
Still Need Expert Help?
Visit one of the LiteSpeed support channels mentioned below.
- Free help is available on the LiteSpeed WordPress Community Facebook group (convenient, official support team), LiteSpeed Cache WordPress repo (slower response), or the official LiteSpeed support page (great option and more privacy for paid users).
- More features can be explained on official LiteSpeed documentation, wiki, and forums.
- Official LiteSpeed cache plugin page.
- Official LiteSpeed Cache X page (Twitter page)
- Official LiteSpeed cache beginner’s guide.
- If you need help but still insist on doing things independently, please respect your level and avoid messing with settings you don’t understand. Litespeed has features for newbies as well as developers and server experts.
- Visit the Official LiteSpeed Blog page for more information about LiteSpeed Cache.
That is all for today.
We hope this article helped you learn about LiteSpeed Cache: The Best Setting for WordPress Websites. You may also want to see our ultimate post on Important Pages All WordPress Blogs Should Consider and A WordPress Plugin: The Complete Guides 2023.
Let us know what you think in the comments below!

